Rings -- Ladder Stitch
This project is easy for young children to make. My nephews made these when they were as young as 4 years old. Any younger than that, then they have needed a lot of assistance.
This tutorial is specifically for rings with a repeating pattern. Variations will be added later.

Supplies:
11/0 seed beads
Thin-gauge wire (I use 34-gauge, but wire as thick as 28-gauge will work)
Scissors
Prep Work:
- String about 40 beads onto a wire, then wrap it around the child's ring finger (or whichever finger she wishes to wear the ring on) to see roughly how many rows of beads will be needed to complete a circle around the child's finger. Each bead equals one row.
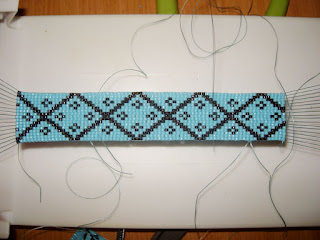
- Map out the pattern. I usually make kids rings with five beads in each row, but any number will work. However, for most patterns, I've found an odd number works best. As you figure out your pattern, you may need to tweak it some so that it will work with the number of rows you need. For instance, the first example shown below can be modified by adding an extra white row between diamonds.
 |
| Examples of Repeating Seed Bead Patterns for Ladder-Stitch Rings |
Making The Ring
- Cut about 4 feet of wire.
- String the first two rows onto wire. For example, to make the first ring pattern shown above, string 7 white beads (five for the first row, two for the second row), a pink bead then two more white beads.
- Slide all beads down to the middle of the wire.

- Fold the wire so that the two rows are side by side, then thread the end of the wire that exits Row 1 back through Row 2. Pull tight.

- Add all beads from Row 3 onto one end of the wire.

- Fold the wire so that Row 3 and Row 2 are side by side. Take the opposite wire end and pass it back through Row 3, and pull tight.

- Repeat steps 5 and 6 for each additional row until the entire length of the ring is complete.


Finishing
Once you've added all of the rows, you'll have two nearly equal lengths of wire coming from the last row, shown in this diagram below as Wire A and Wire B.

To secure the ring, form a circle with the beadwork, then feed Wire A down through Row 1, up through Row 2, down through Row 3, etc., until you have little wire left. Tuck the end of the wire down into a row to keep it from snagging on small fingers and clothing.
Feed Wire B back through the beginning of the ring in same manner, except go UP Row 1, down Row 2, up Row 3, and so on.
Comments
Post a Comment