Posts

Showing posts from June, 2012

A Little Pink and Green

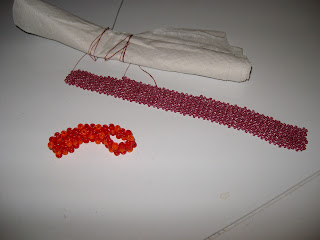
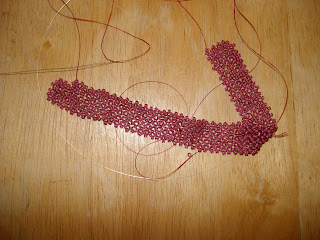
I have a lot of beads in primary and secondary colors, but very few in shades such as pink and neon green, such as these (pink) and these  (green). I think shades such as these would appeal to children more so than the primary and secondary hues I have, and I'd really like to expand my variety of kids bracelet designs. Of course, this will be AFTER I complete the right-angle weave bracelet. (Side note: I worked on it again on my lunch break yesterday. I'm really enjoying using that time to do some beading. I love my little girl more than anything, but it's nice to have that time without having to worry about her knocking beads over. I don't know why it never occurred to me to do that before. The only bad thing: My lunch break is only an hour.)

The New Kids Bracelet

Image
I wasn't able to take a photo of my new kids bracelet before posting, so I've included it here (foreground), along with a photo of the right-angle weave bracelet I've been working on for more than a month now. During my lunch hour at work yesterday, I was able to make a little more progress on it, very little, not quite a complete row. I don't plan to make another kids bracelet until I get the rose one finished. Last evening as I was driving home from work, I started having some thoughts about how I'd like to do the clasp for it. I'm thinking the bar-and-toggle style.

Another Working Lunch

I spent my lunch hour beading again on Tuesday and whipped out another kids bracelet. While I'm glad I have yet another piece to add to my finished pile, I was kind of kicking myself because I could've worked on my right-angle weave bracelet instead. I've been carrying it around in my purse for a couple of weeks now waiting for a chance to work on it, and when finally I get the time once that the festival has passed, what do I do? I forget all about it. I'm really anxious to see how it turns out, because I think the same weave would look really good with a matte green bead I have. I also have a plan for a square-stitch bracelet. I'm getting a mini backlog of ideas building.

I Sold a Few Things

The arts & crafts festival was this past weekend. I didn't get anywhere near as much stuff made as I had hoped -- I made a whopping two kids bracelets -- and I pulled a few things I had made about five or so years ago out of a drawer. Everything I took fit in a quart-size zip-close freezer bag with room to spare, but I still managed to sell six items and make $19. That's actually better than I had expected, considering how few items I had and that the booth was free. Still, though, I wish I had taken more. Before I go to another one, I want to have quite a few items on hand. Maybe by this fall.

Things I've Learned That Help Me

I thought I'd do this week's tutorial a little differently. Rather than give instructions on how to do a stitch, I'm going to give a few tips. While they work well for me, they might not for everyone, based on personal preference and how you like to hold your work, etc. I'm open to any other suggestions, too, from people who read this, so feel free to comment with your own tips. Even if the project doesn't call for it, I always leave enough of a "tail" at the beginning of my string that I can hold it between my index and middle fingers. This helps me to keep the thread taut. (I hold my work with my thumb and ring finger.) When using a stretchy or monofilament stringing material, I like these needles best. They'll stand up to the weight of the string better than anything else. Pulling the string very fast through the beads make it more likely to tangle. It won't happen every time, but for me, it's often enough that I find that having to s

I Lost a Lot of Good Beads on Wednesday

About a half hour before my husband and I were ready to take our daughter to day care so that we could go to work, my daughter reached for one of my open bead cases on my tray table. I tried to head off a disaster, so I reached for it, too, hoping to grab it in time. Instead, both of our hands reached it at the same time, sending the beads all over the living room carpet. I moved the tray table out of the way, my husband put our girl in her playard, then we both picked them up. This time, I was lucky -- they were size 6 beads, big enough not to get worked down into the carpet very easily. Between the two of us, we got them picked up in about 10 minutes. Then, I went to move my tray table, still topped with open bead containers (a smarter person would've put the lids on after the first fiasco), out of the way and wound up knocking the whole thing over. This time, a mess of size 11 beads littered the living room floor. By then, we had no time to pick them up before we had to go

While on My Lunch Break ...

Image
I'm thinking about attending another arts and crafts festival very soon, even though I still don't have a whole lot of stuff to show. The good news is that booths for this event are free, unlike the last one that cost $75. Getting there won't be cheap, and I'm sure to dine out at least once that day, so to even break even, I probably need to sell about $25 worth. So, I need to get some work done, and quickly. I'm still working on my rose-colored bracelet , even though I don't think I've had the chance to work on it even one time in the past week. In fact,  I'm still far enough away on finishing it that I figured it wouldn't be ready for the upcoming festival. Instead, I decided to see how much kids stuff I could whip out between now and then. When I headed off to work Tuesday, I packed my lunch and a bunch of beads. This is what I made on my lunch hour: Now, if only I could make another five or six of those before the festival.

An Extra Post

As I've mentioned before, I love to shop at Fire Mountain Gems. One of the things I like about it is its catalog. It has a lot of designs throughout, along with the title of the project and where you can find a list of supplies for it on the Fire Mountain Gems website. This might be a common thing that beading catalogs do. I wouldn't know, though, because Fire Mountain is the only online bead seller that sends me a catalog regularly.

Tutorial to Return Next Monday

My husband and I have been dealing with a sick baby again. The poor little girl, I wish I could just sit and hold her all day. Because of this, though, I won't be able to get a tutorial up this week. I hope to get back on track next week. Hopefully, she's doing better then.

Thunderbird Supply Co.

I've shopped a time or two at Thunderbird Supply Co. for beads, findings and stringing material. I love the site's variety and that, like Fire Mountain Gems, it offers bigger discounts for bigger orders. Unlike Fire Mountain, though, the combination discount doesn't apply to everything the site offers, just select items, but the prices are still pretty good. Its shipping prices are a little higher than FM, but not enough to deter me from buying through Thunderbird. I browse every once in a while. It's been a year or more since I've bought from T-bird, but I'm just not buying beads as often as I did before I had my daughter.

Bracelet Update

Yet again, I've made only marginal progress on my latest project. My baby girl was sick recently, and the first day she was sick -- last Tuesday -- she spent the bulk of the day sleeping. I got quite a bit done that day, hence the progress I made last week . However, on Wednesday and Thursday, she spent most of the day wanting to be held. She still slept more than usual, but not enough for me to drag out my beading table. I've done one more row over last week. That's it. I did find a way to take my beading with me to work, though. As I mentioned in my May 30 post , I had taken the bracelet to work but spent most of my lunch trying to unravel the thread. Since then, I've carried it with me, but rather than just dumping it all in my bag, I wrap it around a rolled up sheet of paper towel, just as if it were on a spool, then I fold the paper in half, leaving the beadwork on the outside. So far, it's held up to being hauled back and forth. Yay!

Peyote Stitch-Odd Count

Image
Years ago, I had an idea for a bracelet that called for an odd number of rows in the peyote weave. I was still a newbie at beading, and that was the first time I had worked with an odd-count peyote. It wasn't until I got to the end of a row that I realized the odd-count doesn't work the same as even. None of the books I owned at the time mentioned how to handle the odd count, so I had to Google it. Since then, I've added two books to my bead book stash that have odd-count peyote instructions. The instructions in both books are not only different from each other, but also from the website I found. Rather than include instructions for all ways, I'm just going to outline the one I use most. Just a couple of notes about this tutorial: Like the others I have on this site, these instructions mention working from right to left or left to right, with left being the side of the beadwork that contains the first bead on the string. In all illustrations, beads will be number

A Lot of Progress

Image
I got quite a bit done on the bracelet I was working on since last week -- compared to the previous week, anyway. I got a couple of rows done. Maybe four. I lose track while I'm working. At this pace, I might have it finished by this time next week. Here's hoping, anyway. I'm not sure how wide I want to make it yet -- maybe a few more rows will do it. I think I really like how the right-angle weave looks. I think I might just keep it plain. I think I'll do a second one in a matte green bead I have, too.

Tutorial Monday: Peyote Stitch -- Even Count

Image
Peyote stitch arranges the beads in a brick-like pattern. Its rows (in all patterns I've seen) are spaced a half-bead apart. Therefore, the rows look like this: Before we begin, here are a few notes about this tutorial: The steps for an even-count and odd-count peyote stitch vary slightly, so this week, we'll cover the even-count version, which is simpler, and next week, we'll cover the odd count. Like my other tutorials, this mentions working from left to right, with left being the side of the beadwork that contains the first bead on the string. For clarity, beads in row 1 will be labeled 1a, 1b and 1c. Beads in row 2 will be labeled 2a, 2b and 2c. 1. String an even number of beads onto your threading material. (In these illustrations, we will use six beads, which will make three beads per row.) 2. Pick up one bead. This will be 3c. Pass the needle from right to left through bead 2c. 3. Pick up one bead. This will be 3b. Pass the needle from r

"Beadwork Creates Beaded Rings"

Image
While I've never made any of the 30 projects in "Beadwork Creates Beaded Rings," edited by Jean Campbell, I like it because it shows me what's possible. For me, it serves more as a springboard for getting me to think outside the box. Some projects call for beadweaving, others use wire, a few combine the two. One even uses netted fabric to hold the stones. The instructions are easy to follow, and many illustrations feature the project in various colors. I always enjoy seeing the same project in several incarnations.