Posts

Beading Software

I have an idea for a Halloween-themed bead project, but in order to get it to look right, I'll have to map it out on paper and create a pattern. That means a lot of time with colored pencils and graph paper, coloring, erasing and redrawing until I get it just right. It occurred to me, though, that perhaps there is software that could automate part of the process. So I did a Google search, and it turns out, there is. I have no idea why I never thought to look for this sort of software before. I like to hear from other beaders who use software to create patterns. What do you think of Easy Bead Patterns ,  Bead Tool , Bead Creator , Bead Canvas or Bead Wizard ? I'm mostly interested in Easy Bead Pattern, Bead Tool, Bead Canvas and Bead Wizard because of cost (Easy Bead Patterns is free; Bead Tool costs $45; Bead Wizard is $50; Bead Canvas costs $40; and Bead Creator ranges from $150-$250), but I'd like to hear opinions on any program. Is it useful? Is it worth the cost? ...

Bead Seller Giveaway and Two Lessons Learned

Image
Fire Mountain Gems Giveaway Because of a tweet, I found out Fire Mountain Gems is having a giveaway. You enter through the shop's  Facebook page for free supplies. The first giveaway is today. I've got my fingers crossed that I'll be among the winners, but I still wish good luck to everyone else who enters, too. Stretchy String Not Good I made some children's necklaces out of wooden beads and stretchy string one day last week and gave one to my toddler. Within minutes, she had the stretchy string stretched out so that there are now some huge gaps between the beads. I think next time, I'm going to use monofilament. Deer Skin Project On Hold A few months ago, I mentioned  that I was stitching beads onto deer skin for the first time. I got into a rhythm with attaching the beads, but it was slow going and the further along I got in the project, the more I wished that I had used a different color. The brown of the skin and of the beads is just too close. I th...

On The Fringe

Image
I made this bracelet on a loom a little over a year ago. Overall, I like the way it looks, but I think it needs something on the edges. I'm thinking a black fringe might be just the thing. Putting it on, though, is easier said than done. When I worked the warp threads back through it, I wound up passing through the edge beads several times on both ends. As a result, I cannot fit one more thread through the beads at the far ends. I've tried several times. This was my first loom project of this type in several years, so I had forgotten just how crowded the edges can become. Lesson learned. Next time, I'll try to better plan where I weave the warp threads to prevent this problem. The only questions I have are: Is this bracelet hopeless? Should I just break it down so I can save the beads? Or do I see if anyone one Etsy might be interested in buying it without the fringe? Any thoughts?

"Pin" Spirations

As I am with most social media, I am a late comer to Pinterest . I set up an account a few years ago, surfed the site a little, pinned a few things, but ultimately decided I just didn't get it. So I stopped visiting the site. Over the past month, I've been spending time on Google+ and through a few connections there, I've found my way back to Pinterest. This time around, though, I have a much better understanding of how the site works, and I've learned that it has a wealth of information and inspiration, and not just for beaders. I found projects that incorporate resin and needled felt and even a few my toddler and I could do together. On the home decorating front, I've also found a clever and stylish tips such as using a wine rack to hold towels, tea cups as shades and turning a dresser into a bench. Readers on Pinterest who would like to connect with me there can find me at  http://pinterest.com/catie70 . I'd love to see what inspires you, too.

The Fluke That Made Me Smile

Image
Magnifying Glass and Twin Two-Hole Beads I've been away from blogging for a few weeks while I work on a freelance project, but now, finally, I have the bulk of the work behind me. On Monday, feeling ready to shift my focus back to crafts, my mom and I stopped in at a bead shop we had never visited before. It's  Whimsy House of Beads  in Tahlequah, Oklahoma, and we just happened to see the sign for it as we were driving past. To add to our happy coincidence, the shop is normally closed Mondays, but the owner decided to open her doors as she waited for UPS to make a delivery. The store isn't huge, but it's full of beads and beading supplies without being cluttered. The photo above shows a couple of my purchases -- a magnifier-chain holder and twin two-hole beads -- that have long been on my wish list. I also found a lot more products I didn't even know existed, such as boards for creating beaded macrame bracelets. I just bought beads, the magnifier and some spac...

Catalog Bonuses

Image
When I don't shop in stores for beads, I order online, which might make looking forward to getting catalogs seem a little pointless. But I look forward to each and every one. There is something to be said about the print format. One of my favorite catalogs is the  Fire Mountain Gems  big book. Like other catalogs, it has page after page of beads, string, wire, tools and other materials, but also, sprinkled all throughout are photos of completed jewelry. Instructions might not be available for all projects shown, but even without the step-by-step, beaders can draw inspiration from what they see. The big book also often contains the color forecast guide shown here, which has a perforated edge so that crafters can tear it out and take it with them wherever they bead. The chart shows predicted fall/winter and spring/summer color trends through summer 2014. I have yet to put much effort in selling my work, but when I'm ready to give it a shot, having a guide for color trends will...

Rings -- Ladder Stitch

Image
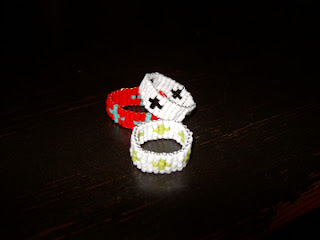
This project is easy for young children to make. My nephews made these when they were as young as 4 years old. Any younger than that, then they have needed a lot of assistance. This tutorial is specifically for rings with a repeating pattern. Variations will be added later. Supplies: 11/0 seed beads Thin- gauge wire (I use 34-gauge, but wire as thick as 28-gauge will work) Scissors Prep Work: String about 40 beads onto a wire, then wrap it around the child's ring finger (or whichever finger she wishes to wear the ring on) to see roughly how many rows of beads will be needed to complete a circle around the child's finger. Each bead equals one row. Map out the pattern. I usually make kids rings with five beads in each row, but any number will work. However, for most patterns, I've found an odd number works best. As you figure out your pattern, you may need to tweak it some so that it will work with the number of rows you need. For instance, the firs...