Posts

"Pin" Spirations

As I am with most social media, I am a late comer to Pinterest . I set up an account a few years ago, surfed the site a little, pinned a few things, but ultimately decided I just didn't get it. So I stopped visiting the site. Over the past month, I've been spending time on Google+ and through a few connections there, I've found my way back to Pinterest. This time around, though, I have a much better understanding of how the site works, and I've learned that it has a wealth of information and inspiration, and not just for beaders. I found projects that incorporate resin and needled felt and even a few my toddler and I could do together. On the home decorating front, I've also found a clever and stylish tips such as using a wine rack to hold towels, tea cups as shades and turning a dresser into a bench. Readers on Pinterest who would like to connect with me there can find me at  http://pinterest.com/catie70 . I'd love to see what inspires you, too.

The Fluke That Made Me Smile

Image
Magnifying Glass and Twin Two-Hole Beads I've been away from blogging for a few weeks while I work on a freelance project, but now, finally, I have the bulk of the work behind me. On Monday, feeling ready to shift my focus back to crafts, my mom and I stopped in at a bead shop we had never visited before. It's  Whimsy House of Beads  in Tahlequah, Oklahoma, and we just happened to see the sign for it as we were driving past. To add to our happy coincidence, the shop is normally closed Mondays, but the owner decided to open her doors as she waited for UPS to make a delivery. The store isn't huge, but it's full of beads and beading supplies without being cluttered. The photo above shows a couple of my purchases -- a magnifier-chain holder and twin two-hole beads -- that have long been on my wish list. I also found a lot more products I didn't even know existed, such as boards for creating beaded macrame bracelets. I just bought beads, the magnifier and some spac...

Catalog Bonuses

Image
When I don't shop in stores for beads, I order online, which might make looking forward to getting catalogs seem a little pointless. But I look forward to each and every one. There is something to be said about the print format. One of my favorite catalogs is the  Fire Mountain Gems  big book. Like other catalogs, it has page after page of beads, string, wire, tools and other materials, but also, sprinkled all throughout are photos of completed jewelry. Instructions might not be available for all projects shown, but even without the step-by-step, beaders can draw inspiration from what they see. The big book also often contains the color forecast guide shown here, which has a perforated edge so that crafters can tear it out and take it with them wherever they bead. The chart shows predicted fall/winter and spring/summer color trends through summer 2014. I have yet to put much effort in selling my work, but when I'm ready to give it a shot, having a guide for color trends will...

Rings -- Ladder Stitch

Image
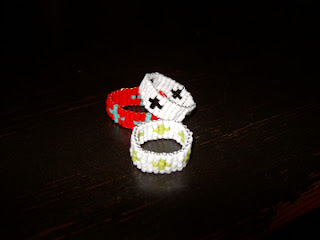
This project is easy for young children to make. My nephews made these when they were as young as 4 years old. Any younger than that, then they have needed a lot of assistance. This tutorial is specifically for rings with a repeating pattern. Variations will be added later. Supplies: 11/0 seed beads Thin- gauge wire (I use 34-gauge, but wire as thick as 28-gauge will work) Scissors Prep Work: String about 40 beads onto a wire, then wrap it around the child's ring finger (or whichever finger she wishes to wear the ring on) to see roughly how many rows of beads will be needed to complete a circle around the child's finger. Each bead equals one row. Map out the pattern. I usually make kids rings with five beads in each row, but any number will work. However, for most patterns, I've found an odd number works best. As you figure out your pattern, you may need to tweak it some so that it will work with the number of rows you need. For instance, the firs...

A Few Minutes Here and There

Image
Because this is my first time working with deer skin , I wind up redoing a stitch about 50 percent of the time, but I'm making some progress when I can catch a few minutes to work on it. I even transported it to work, worrying the whole time that I get the threads tangled, but luckily, I got it there and back without a major mishap. I've been doing a lot Internet searches looking for a good tutorial on how to stitch the deer skin pieces together, but I have yet to find one that makes sense to me. I think part of the problem is that what I've found so far assumes I have more knowledge of hand sewing than I do. Hopefully, I can find something that works for me soon. I welcome any recommendations from readers, even if they're in book form. Freebie! On Saturday, I got an email from ArtBeads  giving me a $5 gift certificate for my birthday. I love that! If you haven't already signed up to get sales promos from ArtBeads, I recommend you do so that you can get some...

Deer Me

Image
I have an idea for a wallet using deerskin I bought several years ago off of eBay . So far, I've done little except for research the best ways to work with deerskin and practice stitching the beads. What I've learned: I need sharper scissors. My regular pair is fine for cutting Nymo thread , monofilament , beading wire  and other stringing material, but making a straight line on deerskin with them is tough. A needle tough enough to go through deerskin yet still thin enough to fit through 11/0 seed beads is hard to find -- in my supply stash anyway. Searching the Internet for "how to sew deerskin" brings up a lot of finished deerskin products for sale but very little info on how to do the sewing; therefore, this project is going to be more "figure it out as I go" than anything I've done to date. I hope to have my first wallet by the end of this next week. I hope once it's finished, it looks as good as it does right now in my mind. A Litt...

Crafts Case on Hand

My daughter and I went to my parents' house Saturday to take my dad a belated Father's Day gift, but once we got there, I found out my dad had to work. So we hung around until he got off work. In total, we were there for seven hours, a rather lengthy visit for me these days. When my daughter's nap time rolled around, I rocked her to sleep. Then wished I had brought my beads with me so I could work on a project during her nap while I visited with my mom and other family members. Therefore, I've decided to keep a mini craft case in my car, just in case I find myself in a place where I unexpectedly have time to bead again. I doubt the opportunity to bead on the go arises very often, probably not even once a month. But those moments when I can are so few and far between right now, I'd like to take them when I can get them.